 Save Pin
 My oven broke on a Tuesday in March, and I needed to feed six people that night. I pulled out my Dutch oven, browned a chuck roast on the stovetop, and let it simmer low for hours while I worked at the kitchen table. The smell of wine and rosemary filled the whole apartment. When I finally lifted the lid, the meat fell apart at the touch of a fork, and I realized I'd never go back to the high-heat method again.
I made this for my neighbor after her surgery, and she called me two days later asking for the recipe. She said it was the first thing that tasted like home in weeks. I wrote it out on a index card and slipped it under her door, and now she makes it every time her kids come to visit.
Ingredients
- Beef chuck roast or blade roast (3 to 3.5 lb): Look for good marbling, those white streaks of fat keep the meat juicy through the long braise and add flavor you cannot fake.
- Kosher salt (1 ½ tsp plus more): Season generously before searing, it forms a crust that locks in moisture and gives the outside a savory edge.
- Freshly ground black pepper (1 tsp): Freshly cracked pepper has a bite that pre-ground cannot match, and it blooms beautifully in the hot oil.
- All-purpose flour (2 tbsp): A light dusting helps the sear develop color faster and adds body to the gravy later, use gluten-free flour if needed.
- Olive oil or vegetable oil (3 tbsp, divided): High smoke point oil is essential for a deep sear without burning, I keep a small dish nearby to add more as needed.
- Unsalted butter (1 tbsp): Adds richness to the sear and a silky finish to the braising liquid, do not skip it.
- Yellow onion (1 large): Thick wedges hold their shape and turn sweet and soft as they cook, they also add natural sugars that balance the acidity of the wine.
- Garlic (4 cloves, smashed and peeled): Smashing releases the oils without turning bitter, and whole cloves melt into the sauce.
- Carrots (4 medium): Cut them into big chunks so they do not turn to mush, they soak up the broth and taste like candy by the end.
- Celery (3 ribs): Adds a subtle vegetal note and structure to the braising liquid, I learned to cut them the same size as the carrots so everything cooks evenly.
- Baby potatoes (1 ½ lb): Waxy potatoes hold their shape and absorb the gravy without falling apart, halve the larger ones so they cook through.
- Tomato paste (2 tbsp): Cooking it down until it darkens adds a deep umami backbone that makes the whole dish taste richer.
- Dry red wine (1 cup): Use something you would drink, it does not have to be expensive but it should not taste like vinegar, substitute with extra broth if you prefer.
- Low-sodium beef broth (2 ½ cups): Low-sodium gives you control over the salt level, and homemade stock makes this taste like a special occasion.
- Worcestershire sauce (1 tsp): Just a splash adds complexity and a hint of tang, check the label if you need it gluten-free.
- Fresh rosemary (2 sprigs): The woodsy aroma fills the kitchen and infuses the meat, dried works but fresh makes it feel intentional.
- Fresh thyme (3 sprigs): Thyme loves slow cooking and adds an earthy sweetness, tie the sprigs with kitchen twine if you want to fish them out easily.
- Bay leaves (2): They add a subtle herbal note you only notice when they are missing, remove them before serving.
- Cornstarch slurry (1 ½ tbsp cornstarch mixed with 2 tbsp cold water): Use this only if you want a thicker gravy, I like mine just thick enough to coat a spoon.
- Chopped fresh parsley (optional): A handful of green at the end makes it look alive and adds a fresh contrast to the rich sauce.
Tired of Takeout? 🥡
Get 10 meals you can make faster than delivery arrives. Seriously.
One email. No spam. Unsubscribe anytime.
Instructions
- Preheat and prep the beef:
- Set your oven to 300°F if you are using it, and pat the roast completely dry with paper towels. Season every side with salt and pepper, then dust lightly with flour and shake off the excess.
- Sear the roast:
- Heat 2 tablespoons of oil and the butter in a heavy pot over medium-high heat until shimmering. Lay the roast in carefully and let it sit undisturbed for 4 to 5 minutes per side until deeply browned, then sear the edges too and transfer to a plate.
- Cook the aromatics:
- Lower the heat to medium and add the last tablespoon of oil if the pot looks dry. Toss in the onion wedges and cook for 3 to 4 minutes until softened and golden, then add the garlic and cook for 30 to 60 seconds until fragrant.
- Build the base:
- Stir in the tomato paste and cook for 1 to 2 minutes until it darkens and smells sweet. Pour in the red wine and scrape up all the browned bits stuck to the bottom, then let it simmer for 2 to 3 minutes to reduce slightly.
- Add the liquid and herbs:
- Pour in the beef broth and Worcestershire sauce, stirring to combine. Drop in the rosemary, thyme, and bay leaves, then nestle the roast back into the pot along with any juices so the liquid comes halfway up the meat.
- Start the braise:
- Bring everything to a gentle simmer over medium heat, then cover tightly and reduce the heat to low or transfer the pot to the oven. Cook for 1 ½ hours without peeking.
- Add the vegetables:
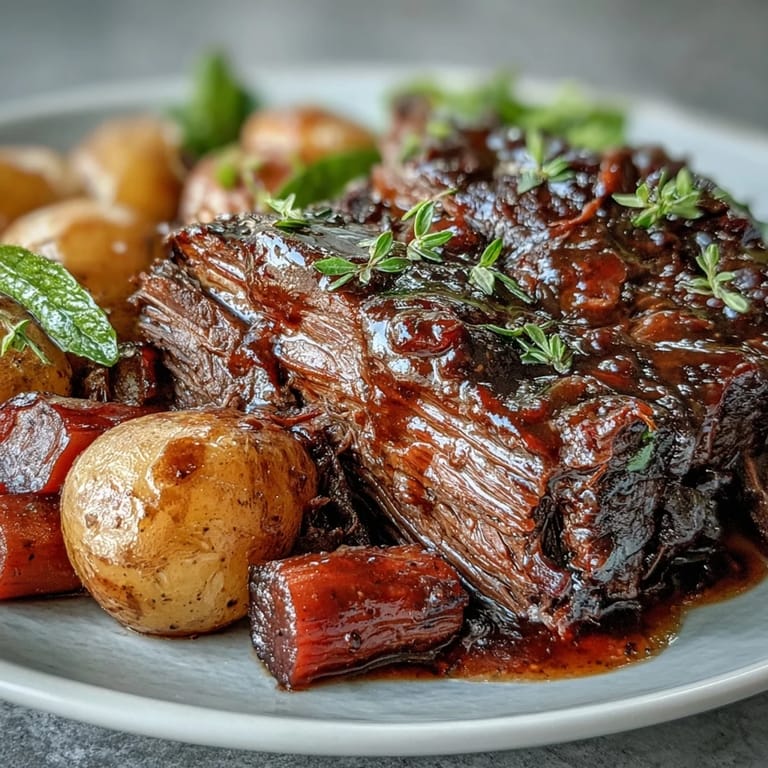
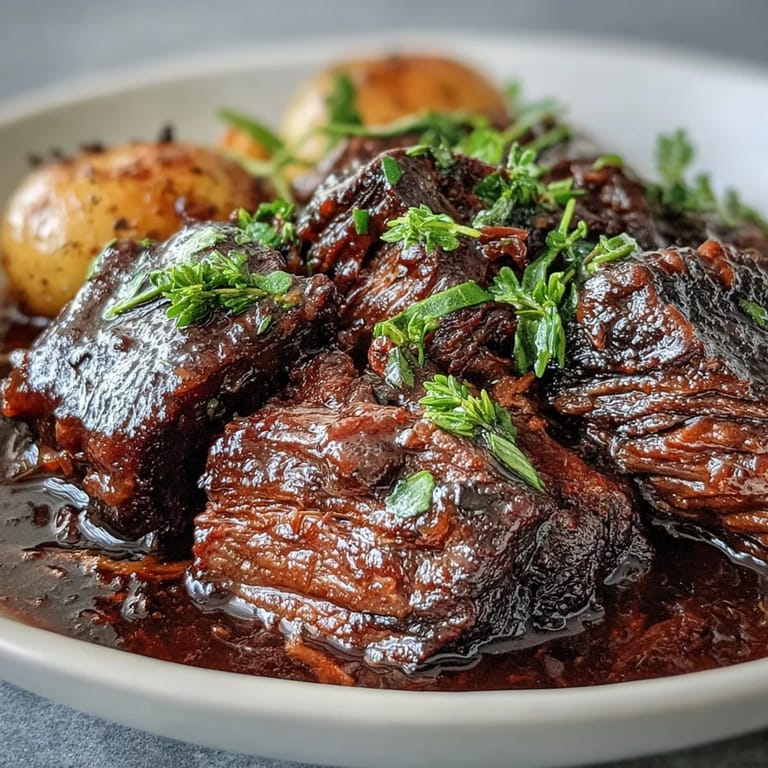
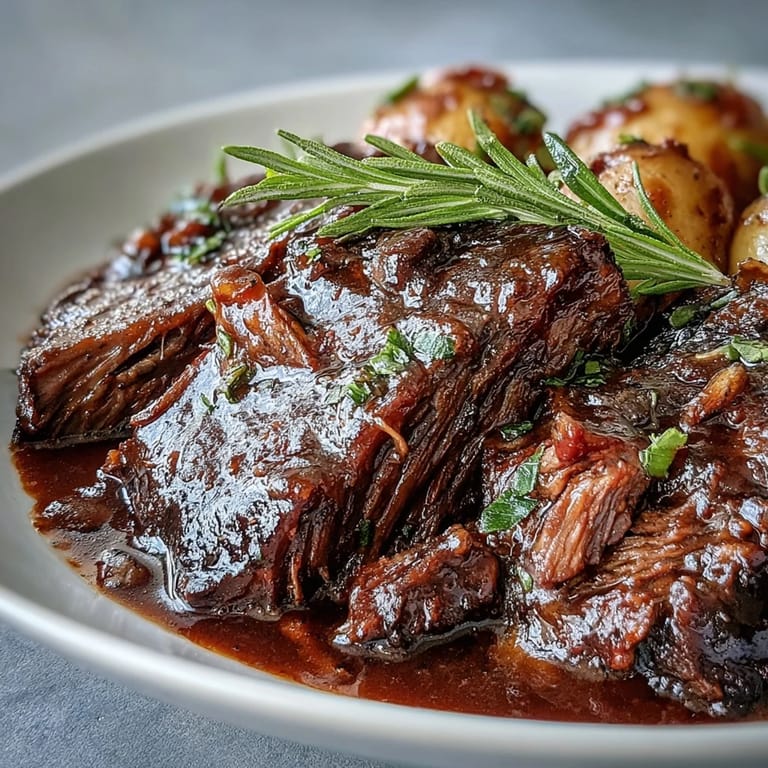
- After 1 ½ hours, carefully turn the roast over and tuck the carrots, celery, and potatoes around it, pushing them into the liquid. Re-cover and cook for another 1 ½ to 2 hours until the beef is fork-tender and the vegetables are soft but still holding their shape.
- Rest and finish the sauce:
- Transfer the roast and vegetables to a platter and tent with foil. Skim any excess fat from the surface of the liquid, then bring it to a simmer and stir in the cornstarch slurry if you want it thicker, cooking for 2 to 3 minutes.
- Serve:
- Discard the herb stems and bay leaves, then shred the beef into large chunks or slice it against the grain. Return the beef to the pot or arrange it over the vegetables, spoon the sauce on top, and scatter parsley over everything if you like.
 Save Pin
 The first time I brought this to a potluck, someone asked if I had catered it. I laughed and told them it was just a chuck roast and patience. Now I make it every time I want to feel like I have my life together, even when I absolutely do not.
How to Choose the Right Cut
Chuck roast is my favorite because it has enough fat to stay juicy through hours of heat, and it shreds beautifully when it is done. Blade roast works just as well and sometimes costs less. Avoid lean cuts like sirloin or round, they dry out and turn tough no matter how long you cook them.
Stovetop vs. Oven vs. Slow Cooker
I have done this all three ways and they all work, but each has a personality. Stovetop requires the most attention but gives you control over the heat. Oven is hands-off and even, perfect if you are doing other things. Slow cooker is the most forgiving and lets you start it in the morning and come home to dinner, just add the vegetables halfway through if you want them to hold their shape.
Making It Your Own
Once you have made this a few times, you will start to improvise. I have added parsnips, turnips, and even fennel depending on what I had. Sometimes I use beer instead of wine, or swap the rosemary for sage. The formula is flexible, just keep the ratio of liquid to meat the same and do not rush the browning.
- Try adding a tablespoon of Dijon mustard to the gravy for a sharp tangy finish.
- Toss in a handful of frozen peas in the last 5 minutes for color and sweetness.
- Serve leftovers over creamy polenta or stuff them into a crusty roll with melted provolone.
 Save Pin
 This is the kind of meal that makes your kitchen smell like someone who knows what they are doing lives there. Make it once and you will understand why people keep asking you to bring it again.
Recipe Questions
- → What cut of beef works best?
Chuck roast or blade roast are ideal choices because they have plenty of marbling and connective tissue that breaks down during long, slow cooking, resulting in incredibly tender meat.
- → Can I make this in a slow cooker?
Absolutely. After searing the beef and sautéing the aromatics, transfer everything to your slow cooker. Cook on low for 8–10 hours or high for 5–6 hours, adding vegetables halfway through cooking.
- → Why is tomato paste used?
Tomato paste adds depth and richness to the braising liquid while helping thicken the gravy. Cooking it briefly with the onions intensifies its sweetness and umami qualities.
- → What can I substitute for red wine?
Additional beef broth works perfectly as a non-alcoholic alternative. You can also use balsamic vinegar or grape juice for a similar acidity and depth of flavor.
- → How do I know when it's done?
The beef is ready when it forks apart easily with no resistance. A fork inserted into the thickest part should slide in and out with zero effort, and the meat should shred into tender chunks.
- → Can I make this ahead?
This dish actually improves overnight. The flavors meld and the gravy thickens as it sits. Store in the refrigerator and reheat gently on the stove, adding a splash of broth if needed.